> ## Documentation Index
> Fetch the complete documentation index at: https://docs.leads.roofera.ai/llms.txt
> Use this file to discover all available pages before exploring further.
# Step 1 — Email setup
> Buy lookalike domains, create inboxes, and add SPF/DKIM/DMARC.
Goal: authenticated inboxes ready for sending.
## Prerequisites
* Access to your domain registrar
* Cloudflare account (free)
* Google Workspace admin access OR Microsoft 365 admin access
* [Instantly Outreach Hypergrowth Plan](https://instantly.ai/?via=roofgpt)
- Choose at least 2 domains that resemble your main brand.
- If your main domain is `acmeroofing.com`, examples: `acmeroof.com`, `acmeroofs.com`.
* Purchase 2–3 Google Workspace user licenses per domain at [Google Workspace](https://workspace.google.com/business/signup/welcome).
* Create 2–3 email addresses per domain (e.g., `first@domain` and `first.last@domain`).
* Purchase 2–3 Microsoft 365 user licenses per domain at [Microsoft 365](https://www.microsoft.com/en-us/microsoft-365/business/no-teams-plans-and-pricing) or through [GoDaddy](https://www.godaddy.com/email/microsoft-365).
* Create 2–3 email addresses per domain (e.g., `first@domain` and `first.last@domain`).
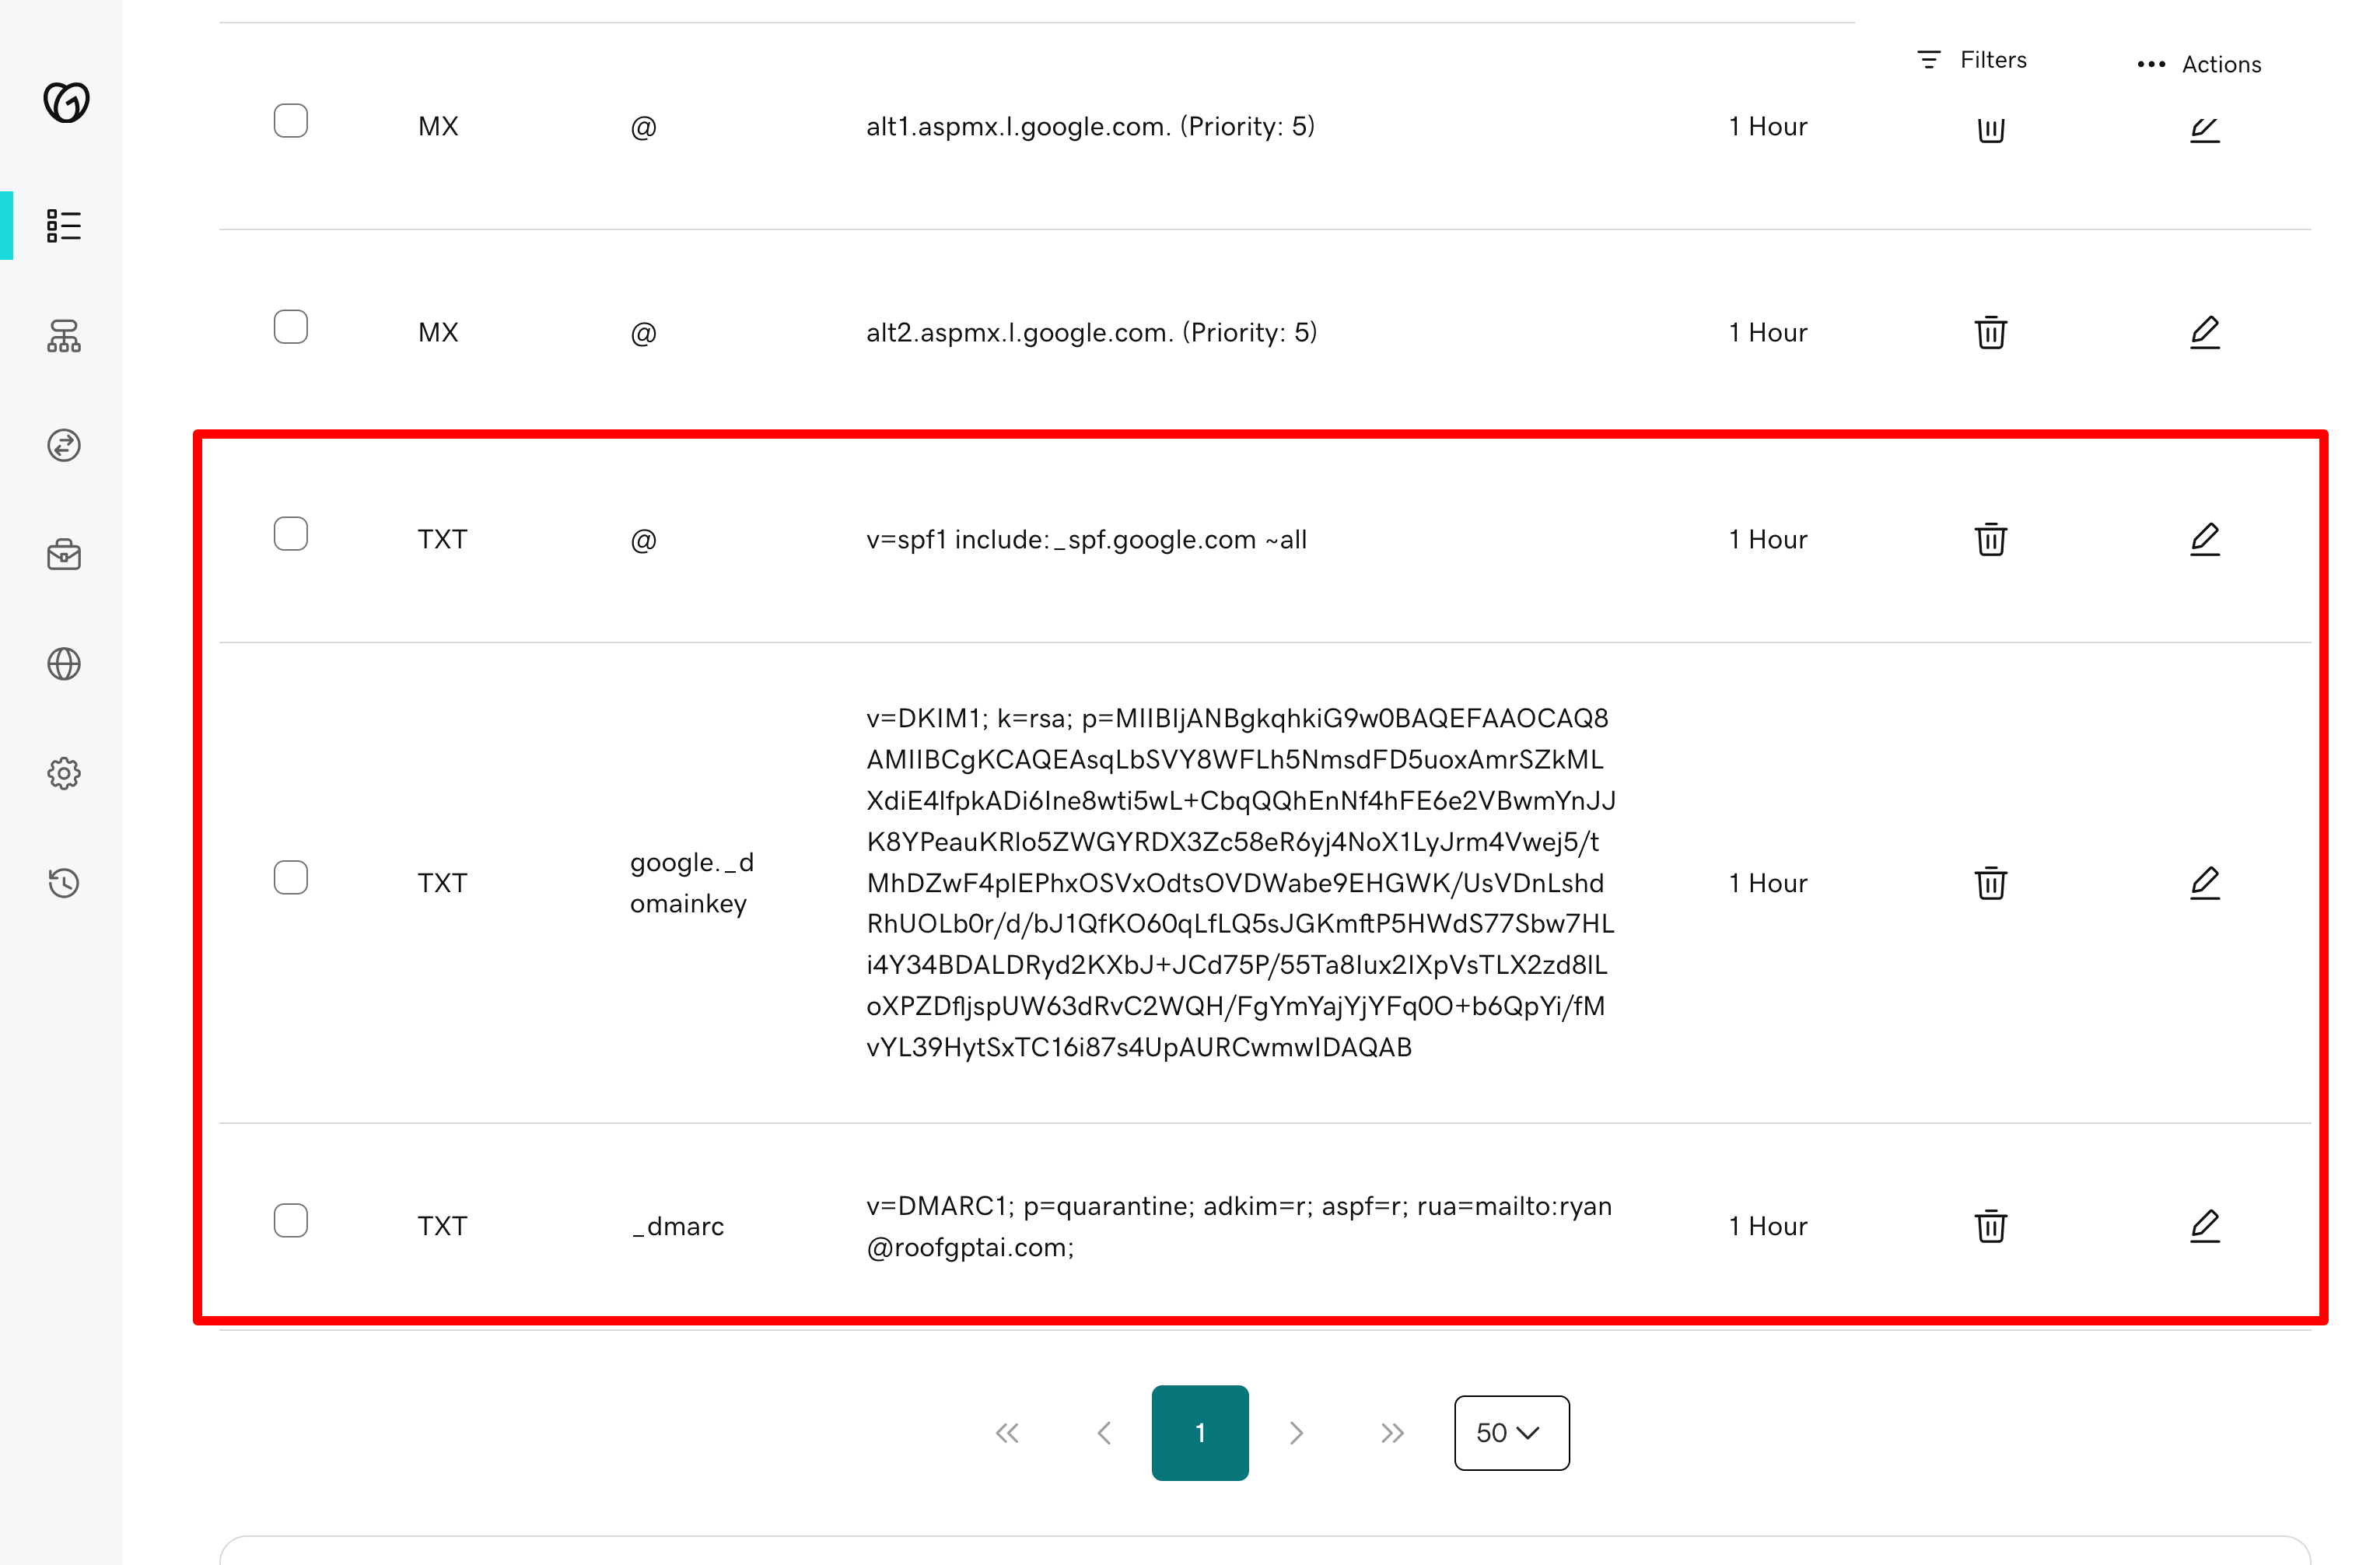
* Add SPF TXT record:
```txt theme={null}
Type: TXT
Name: @
Value: v=spf1 include:_spf.google.com ~all
```
You can only have one SPF record per domain. If you already have an SPF record, merge the Google
include into your existing record.
[Learn more about SPF](https://support.google.com/a/answer/33786?hl=en)
```txt theme={null}
Type: TXT
Name: @
Value: v=spf1 include:spf.protection.outlook.com -all
```
You can only have one SPF record per domain. If you already have an SPF record, merge the
Microsoft include into your existing record.
[Learn more about SPF](https://learn.microsoft.com/en-us/defender-office-365/email-authentication-spf-configure)
***
* Add DMARC policy at `_dmarc`:
```txt theme={null}
Type: TXT
Name: _dmarc
Value: v=DMARC1; p=none; adkim=r; aspf=r; rua=mailto:your-email@domain.com;
```
Replace `your-email@domain.com` with your actual email address where you want to receive DMARC
reports.
[Learn more about DMARC](https://support.google.com/a/answer/2466580?hl=en)
***
* Generate and publish DKIM:
1. Visit [Google Admin](https://admin.google.com/ac/home?hl=en)
2. Go to Apps → Google Workspace → Gmail → Authenticate email
3. Generate a new record. Set **Select DKIM key bit length** to `2048` and **Prefix selector (optional)** to `google`
4. Add the new DNS record at your registrar/DNS host
5. Click Start authenticating in Google Admin
DKIM DNS record (add the value provided by Google Admin):
```txt theme={null}
Type: TXT
Name: google._domainkey
Value: v=DKIM1; k=rsa; p=... <-- (DKIM generated by Google Admin)
```
[Learn more about DKIM](https://support.google.com/a/answer/174124?hl=en)
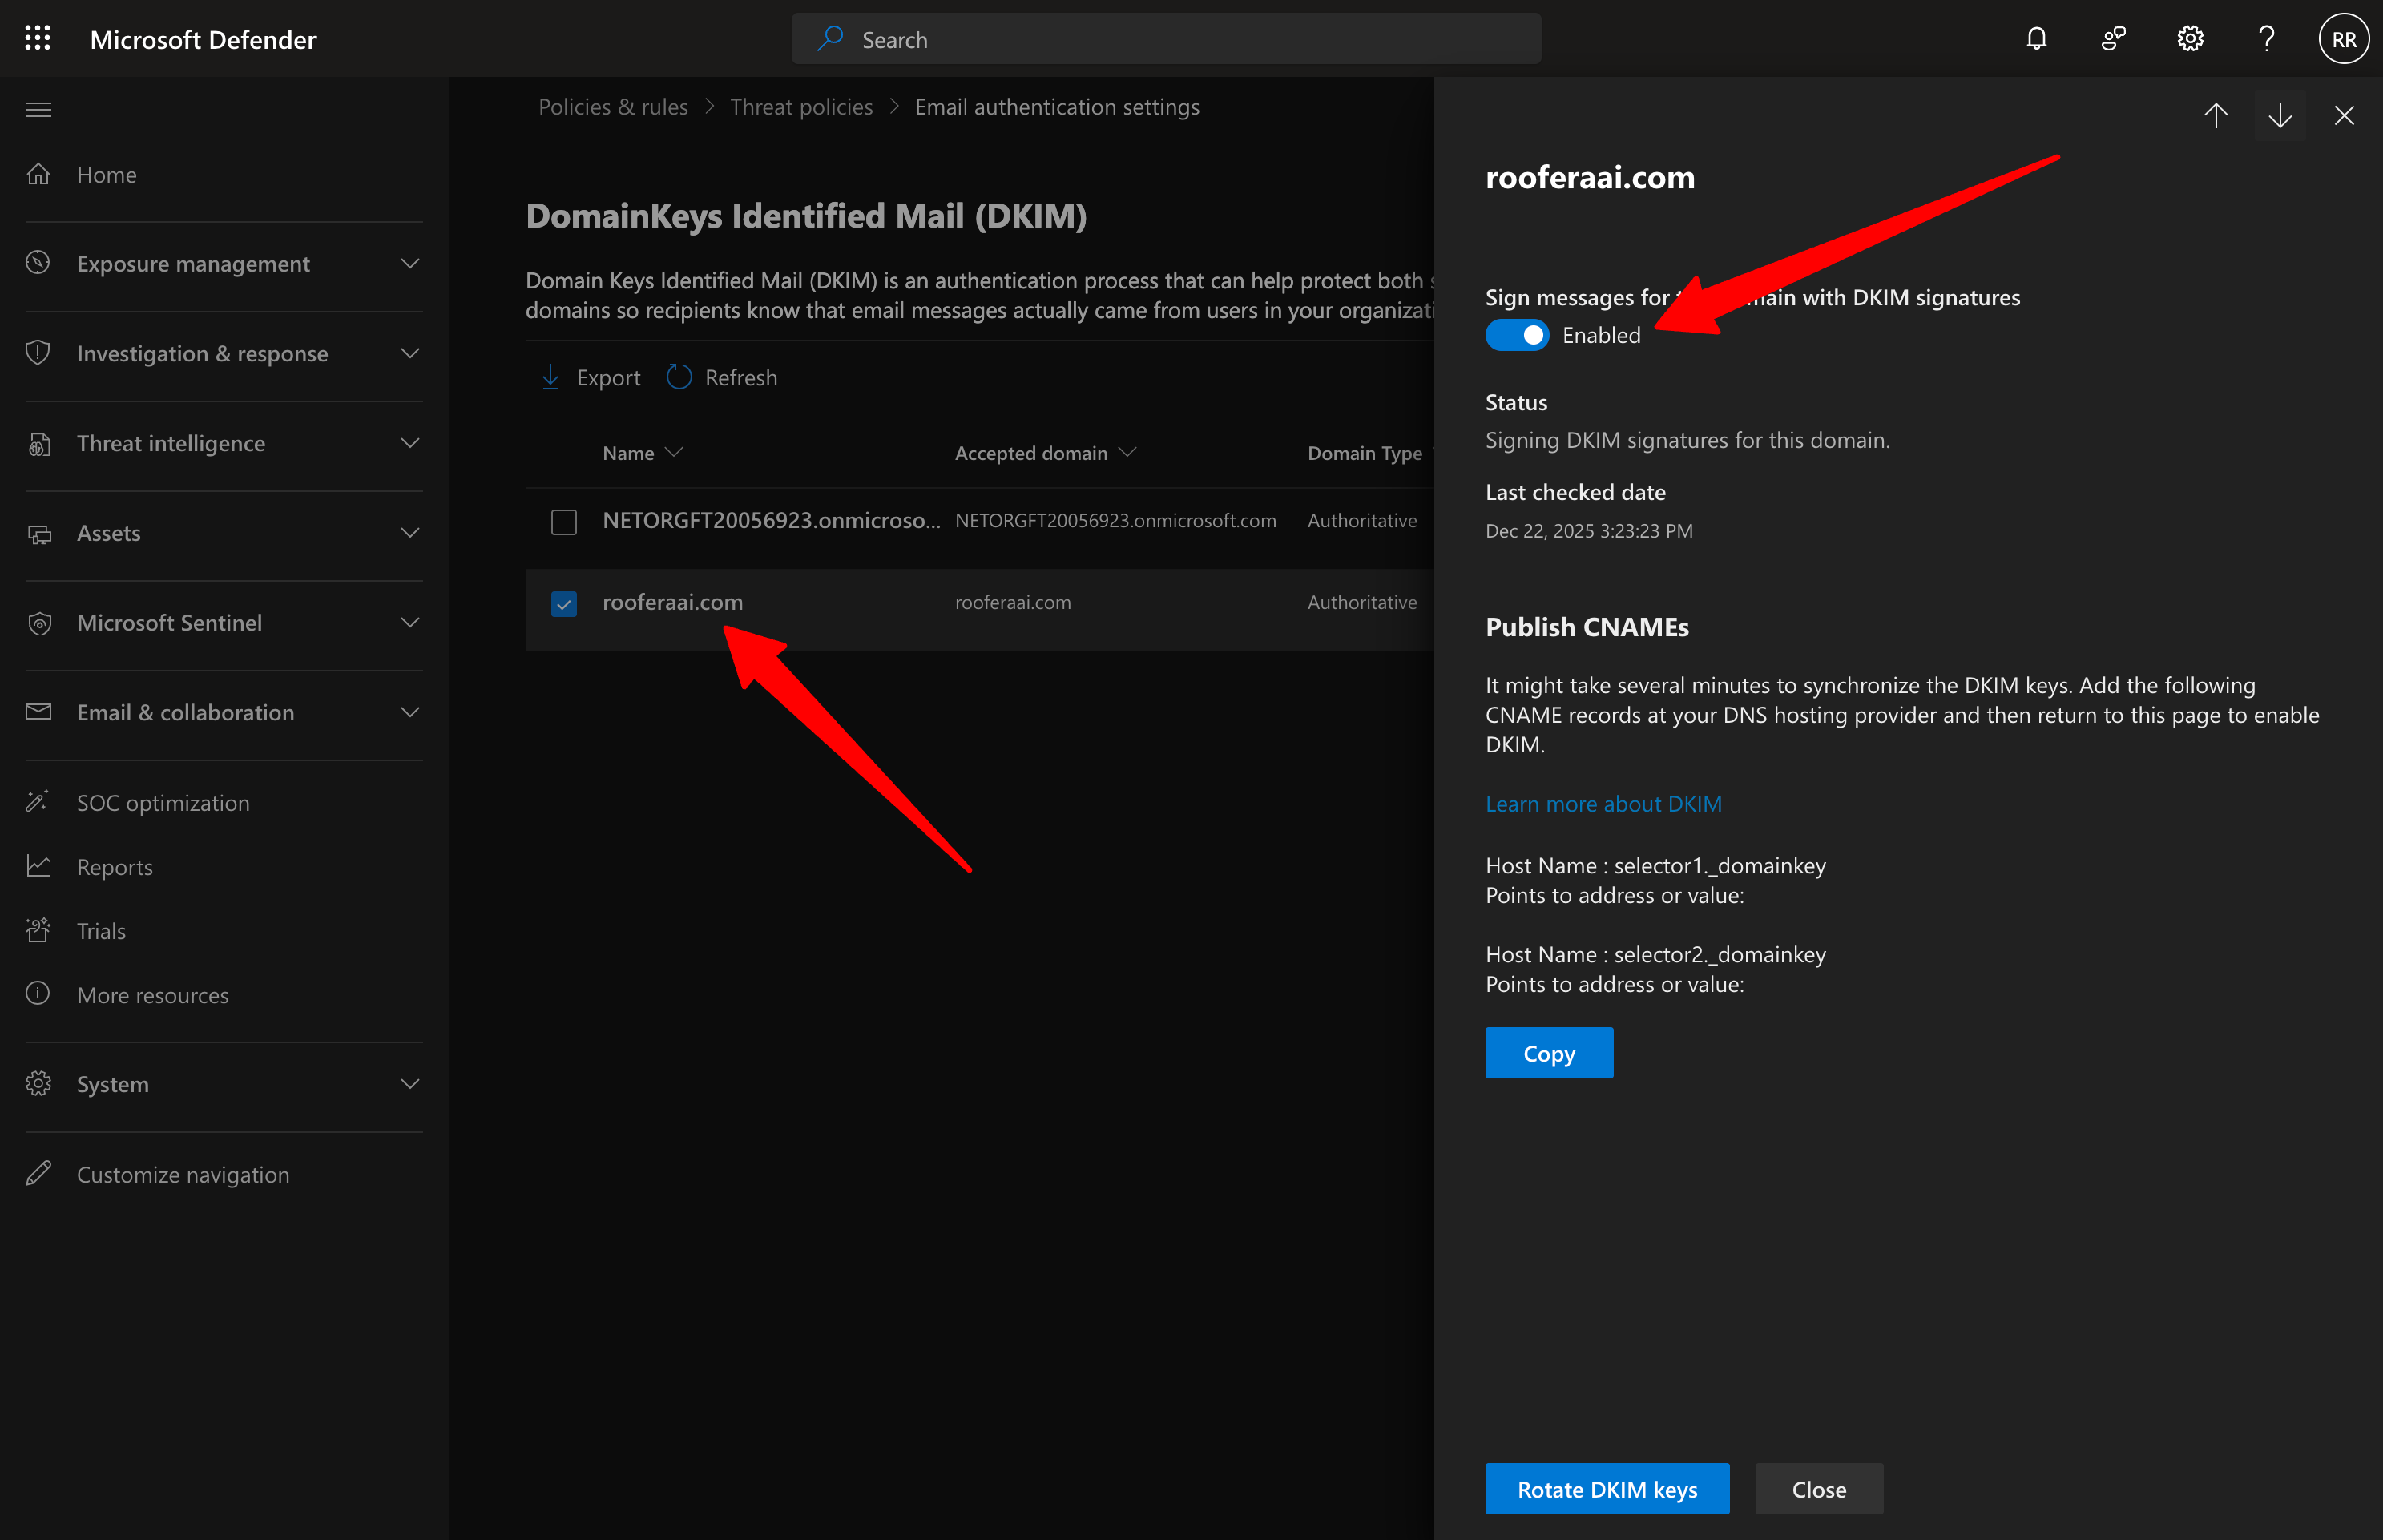
 1. Visit [Microsoft Security Center](https://security.microsoft.com/dkimv2)
2. Select your domain from the list
3. Copy the two CNAME records provided (selector1 and selector2)
4. Add both CNAME records to your DNS registrar
5. Return to the Microsoft Security Center and enable **Sign messages for this domain with DKIM signatures**
DKIM DNS records (add both CNAME records provided by Microsoft):
```txt theme={null}
Type: CNAME
Name: selector1._domainkey
Value: selector1-._domainkey..onmicrosoft.com
Type: CNAME
Name: selector2._domainkey
Value: selector2-._domainkey..onmicrosoft.com
```
The exact CNAME values will be provided by the Microsoft Security Center. Copy them exactly as
shown.
1. Visit [Microsoft Security Center](https://security.microsoft.com/dkimv2)
2. Select your domain from the list
3. Copy the two CNAME records provided (selector1 and selector2)
4. Add both CNAME records to your DNS registrar
5. Return to the Microsoft Security Center and enable **Sign messages for this domain with DKIM signatures**
DKIM DNS records (add both CNAME records provided by Microsoft):
```txt theme={null}
Type: CNAME
Name: selector1._domainkey
Value: selector1-._domainkey..onmicrosoft.com
Type: CNAME
Name: selector2._domainkey
Value: selector2-._domainkey..onmicrosoft.com
```
The exact CNAME values will be provided by the Microsoft Security Center. Copy them exactly as
shown.
 ***
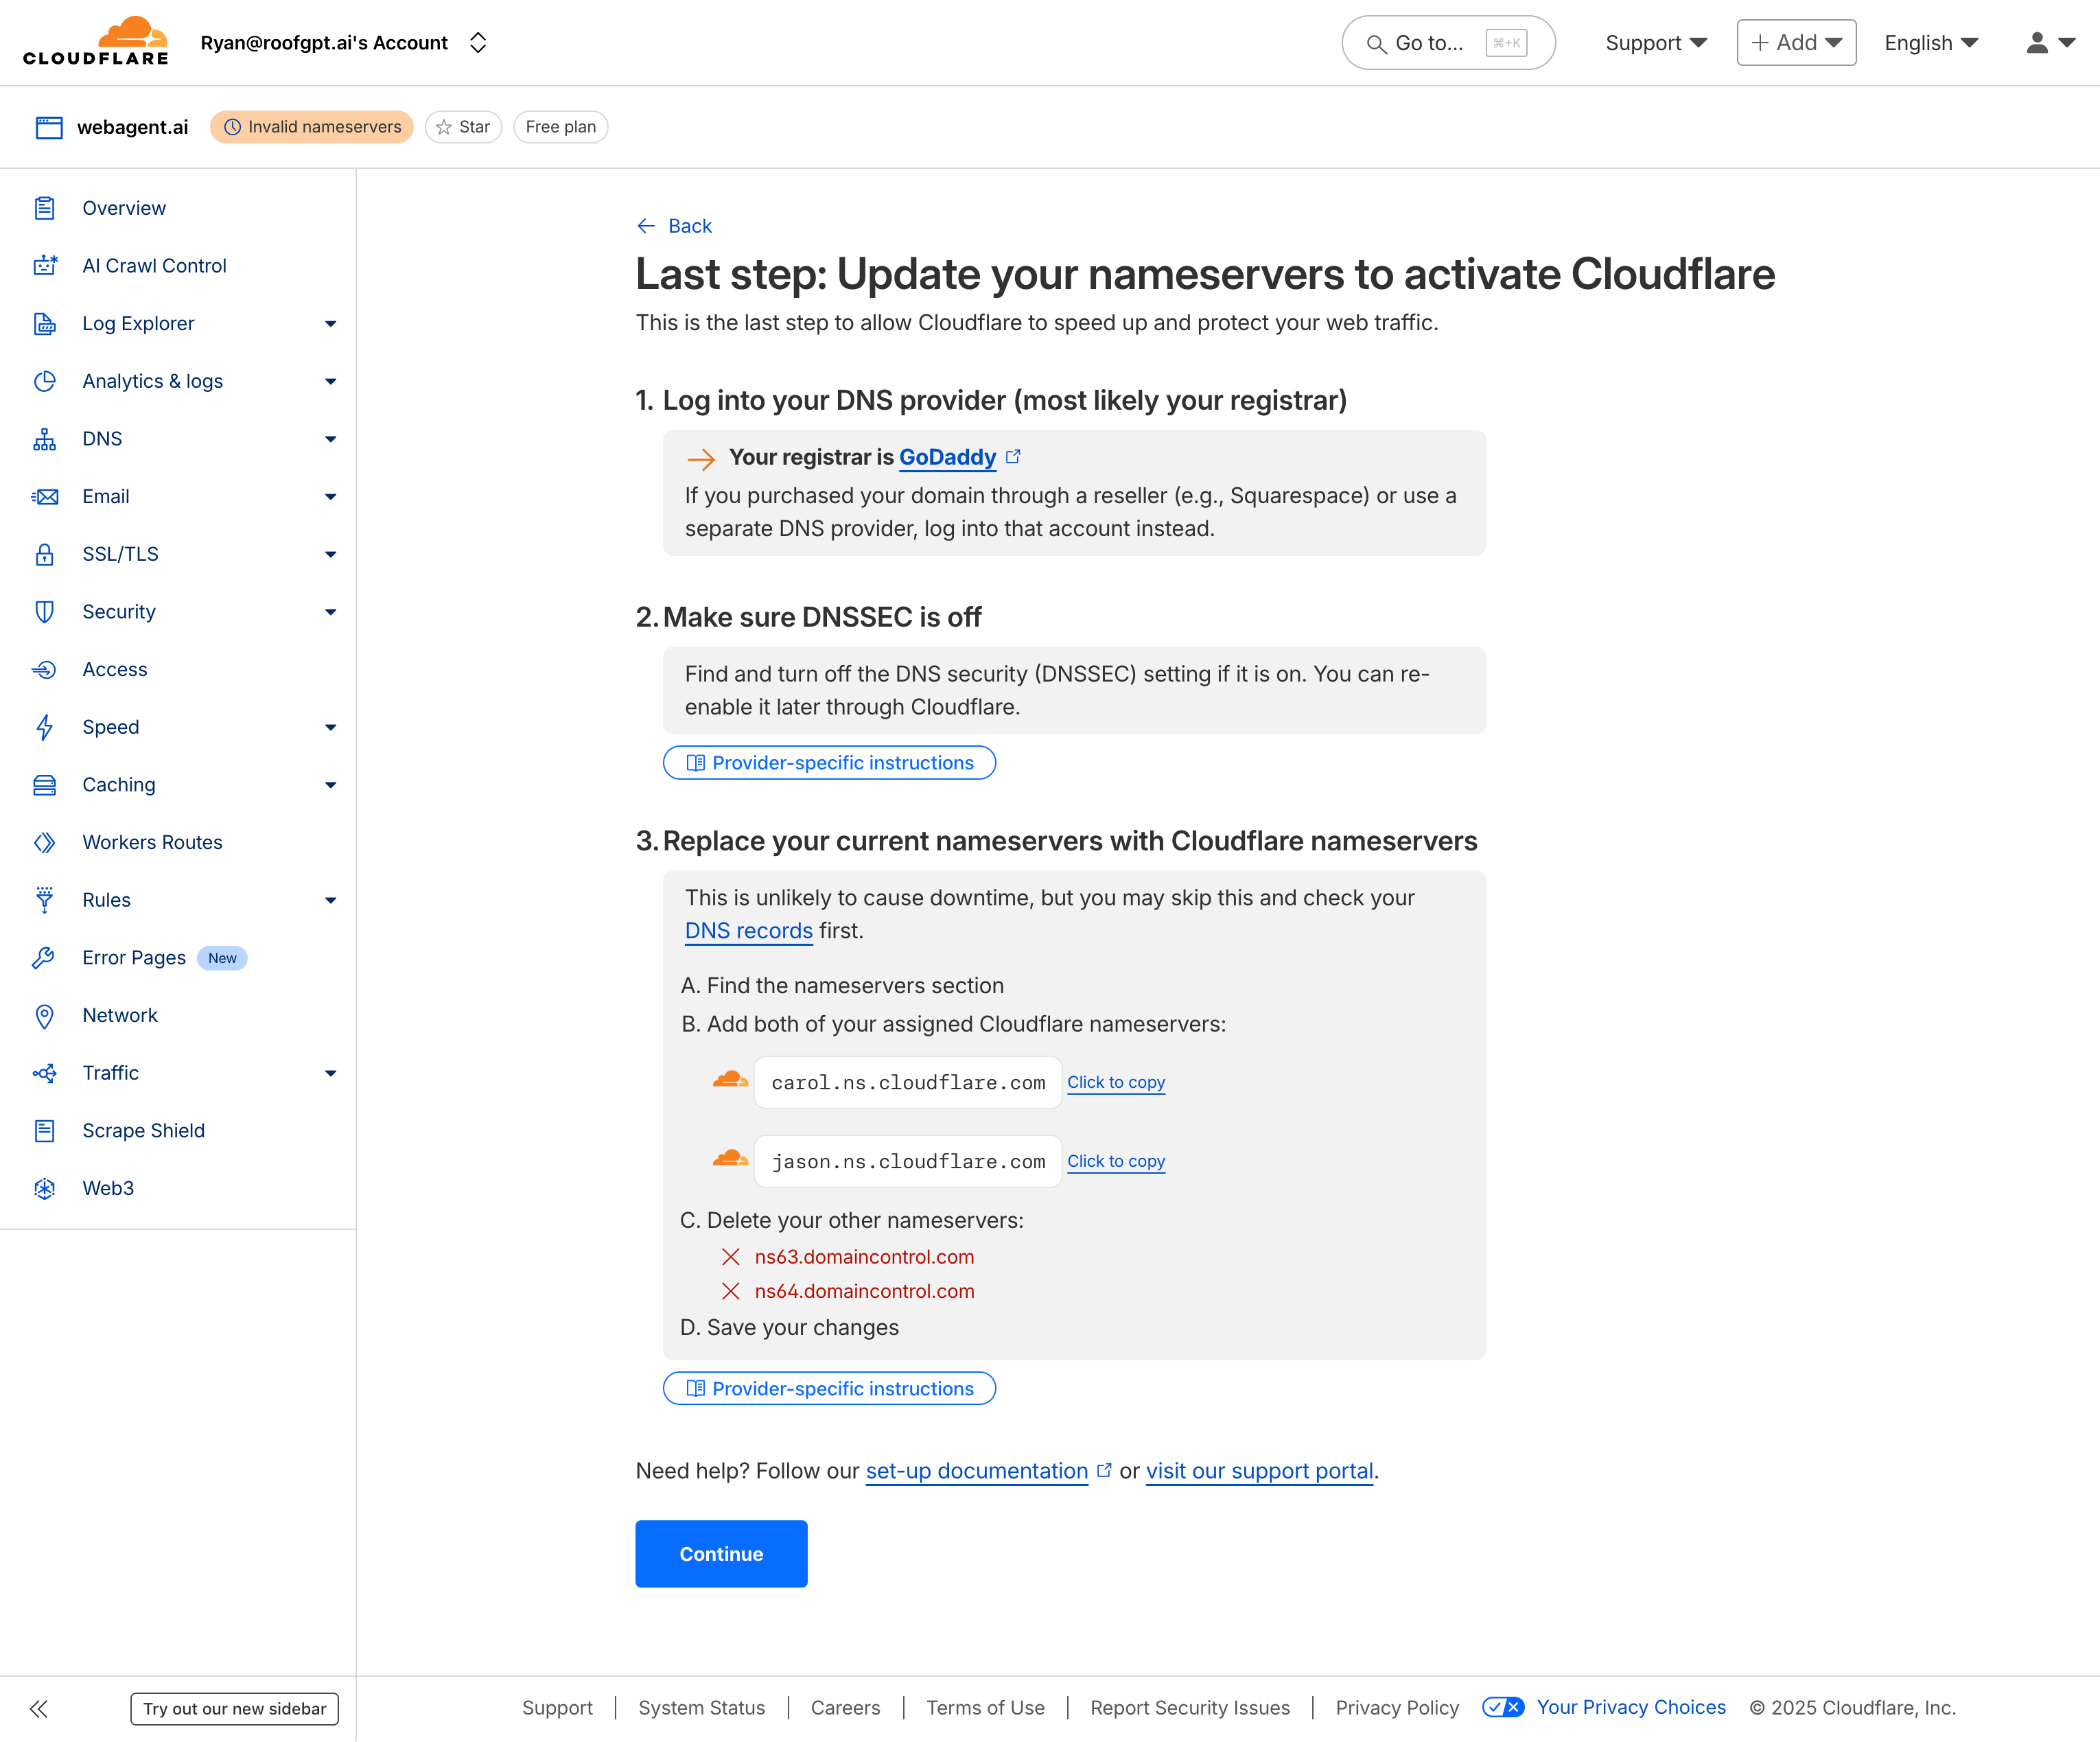
* Create a free Cloudflare account if you do not already have one.
* Add your lookalike domain to Cloudflare.
* Move the existing domain: when prompted, update your registrar's nameservers to the two Cloudflare nameservers provided.
* After updating nameservers, wait a few minutes for propagation.
When moving to Cloudflare, set all email-related DNS records to DNS only: MX, SPF TXT,
DKIM records (TXT for Google: `google._domainkey`, or CNAME for Microsoft:
`selector1._domainkey` and `selector2._domainkey`), and DMARC TXT (`_dmarc`). Set website
records (root `A`/`CNAME`, `www`) to Proxied.
***
* Create a free Cloudflare account if you do not already have one.
* Add your lookalike domain to Cloudflare.
* Move the existing domain: when prompted, update your registrar's nameservers to the two Cloudflare nameservers provided.
* After updating nameservers, wait a few minutes for propagation.
When moving to Cloudflare, set all email-related DNS records to DNS only: MX, SPF TXT,
DKIM records (TXT for Google: `google._domainkey`, or CNAME for Microsoft:
`selector1._domainkey` and `selector2._domainkey`), and DMARC TXT (`_dmarc`). Set website
records (root `A`/`CNAME`, `www`) to Proxied.
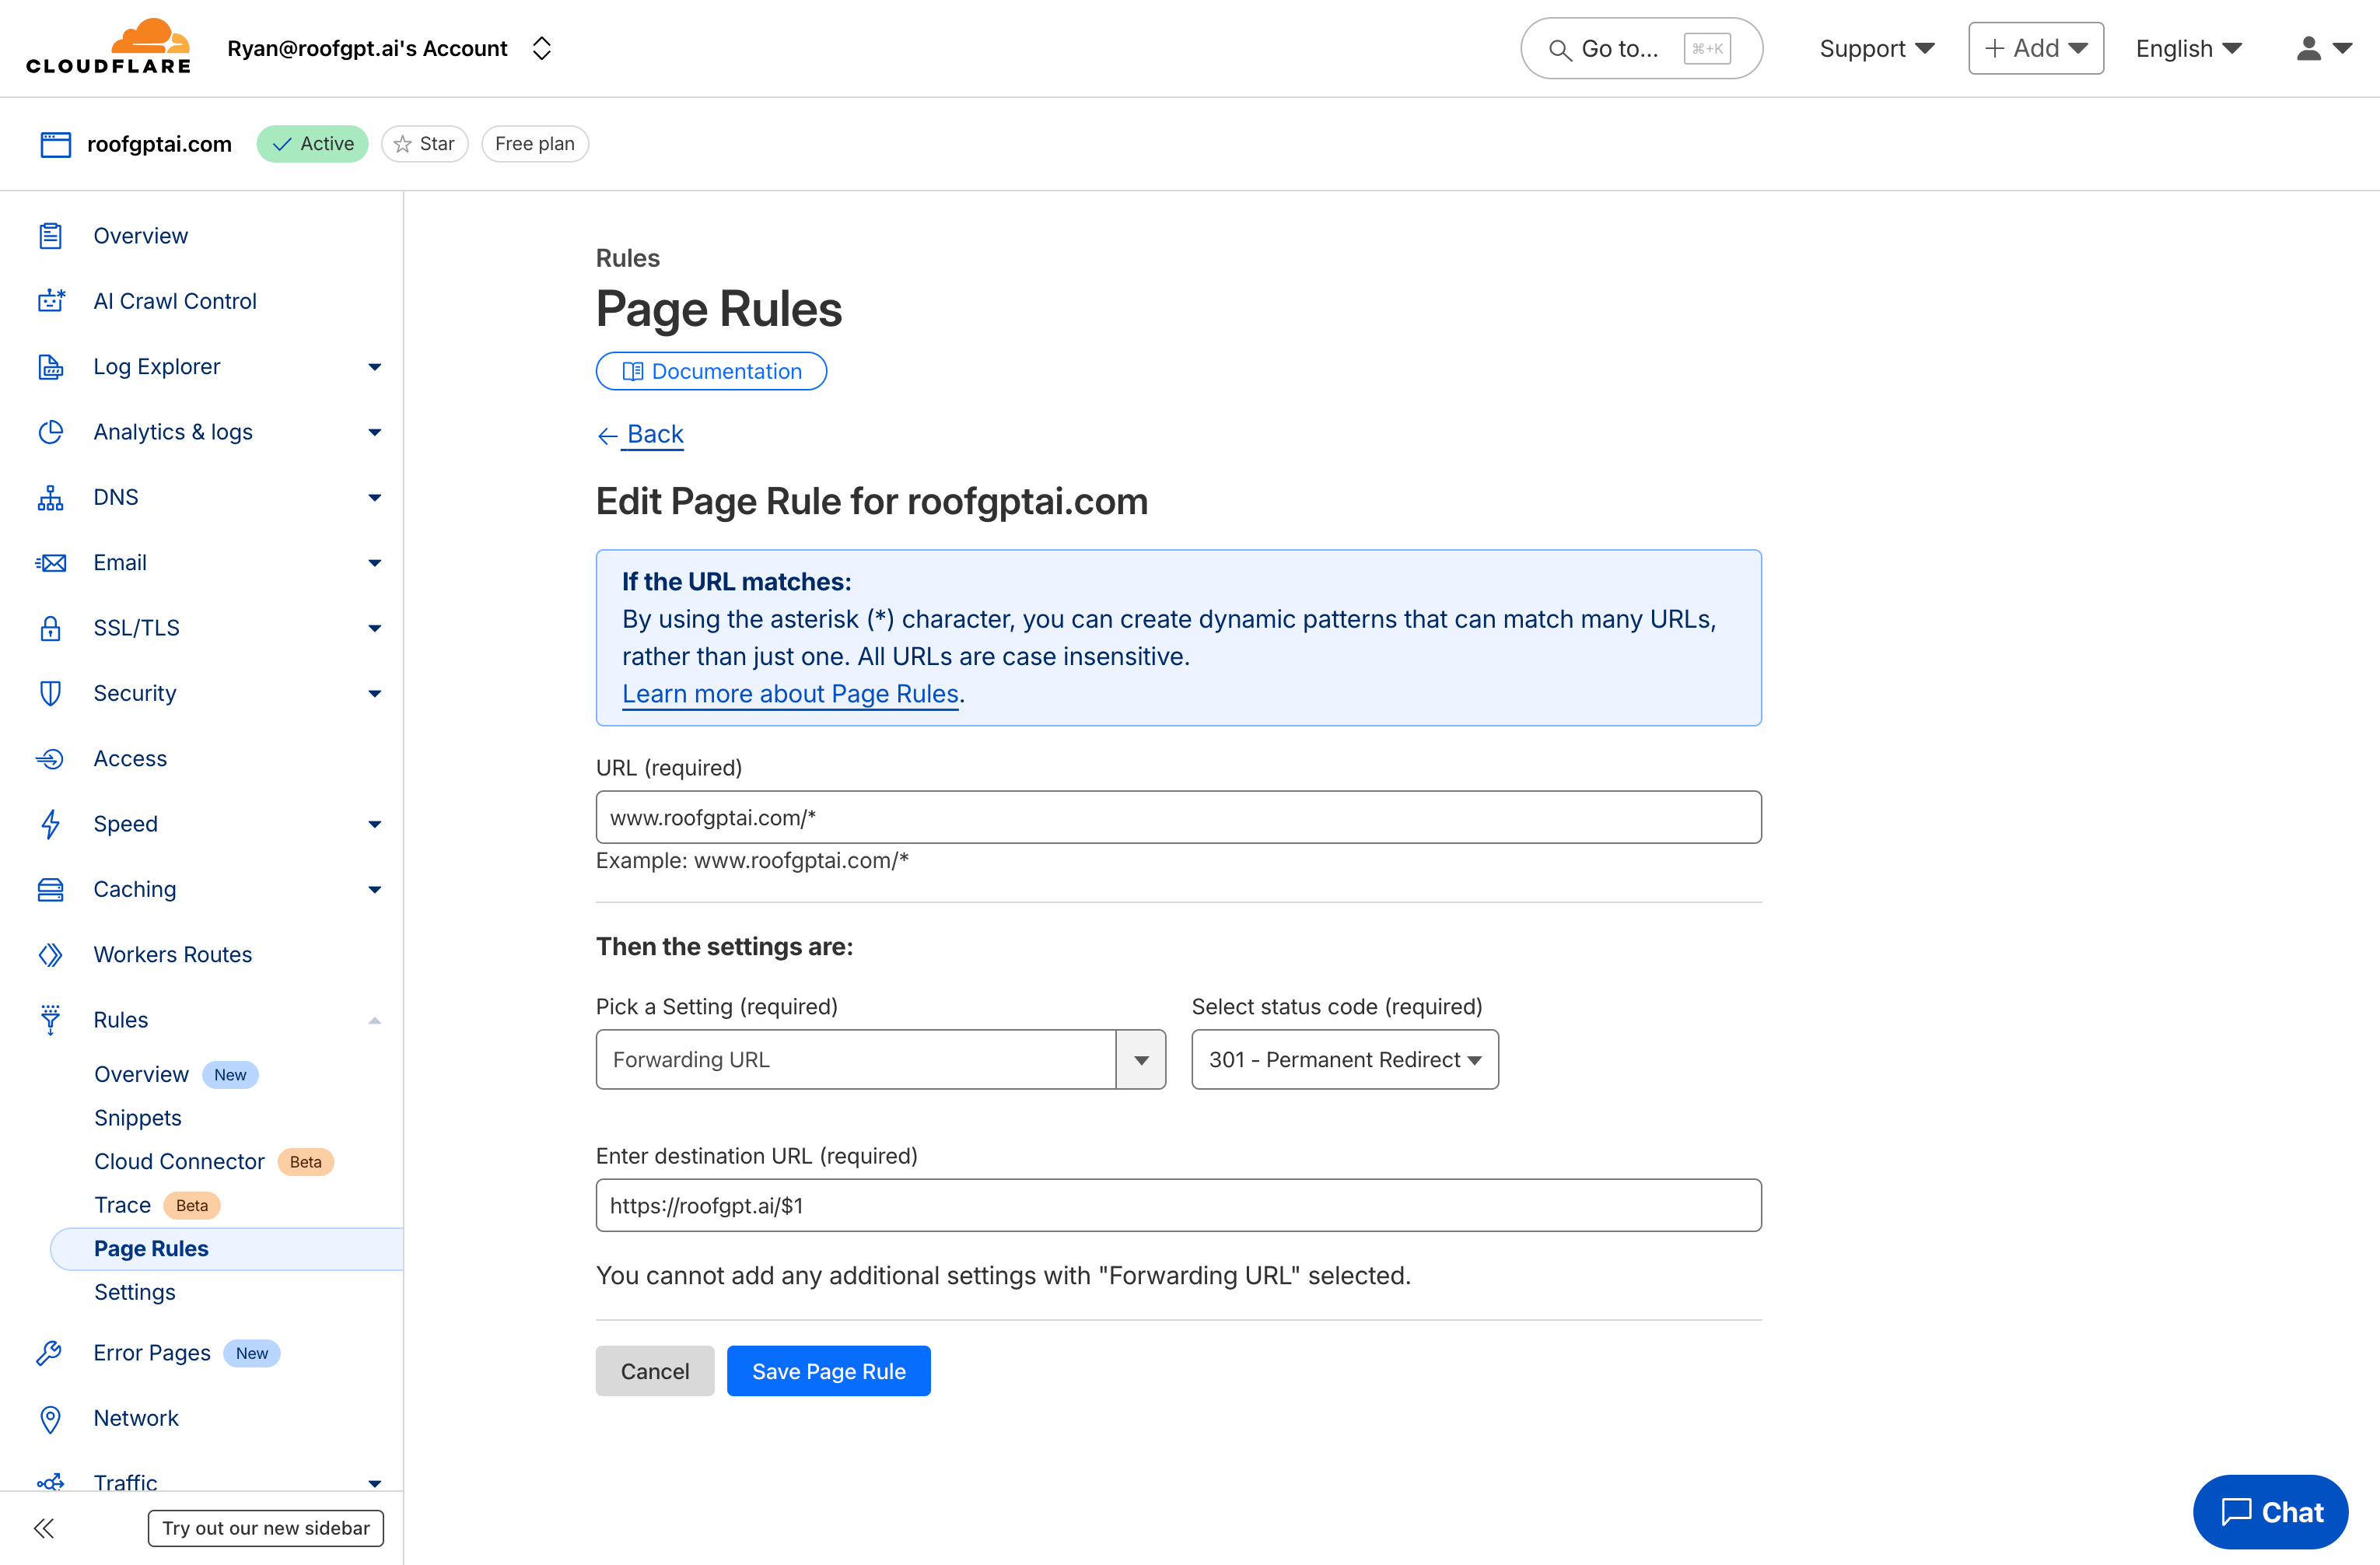
 *
Using Cloudflare Page Rules instead of registrar DNS forwarding prevents email service
providers from detecting and flagging your domain for cold outreach. Registrar forwarding is
easily identified; Cloudflare forwarding is not.
* Once the domain shows as Active in Cloudflare, create a Page Rule to forward the lookalike to your primary domain:
1. Open your domain in Cloudflare → Rules → Page Rules → Create Page Rule.
2. If URL matches: `https://your-lookalike.com/*` (the `*` matches any path).
3. Setting: `Forwarding URL` with status code `301 - Permanent Redirect`.
4. Destination URL: `https://your-primary.com/$1` (the `$1` preserves the path after the domain).
5. Save and deploy, then test by visiting the lookalike domain.
*
Using Cloudflare Page Rules instead of registrar DNS forwarding prevents email service
providers from detecting and flagging your domain for cold outreach. Registrar forwarding is
easily identified; Cloudflare forwarding is not.
* Once the domain shows as Active in Cloudflare, create a Page Rule to forward the lookalike to your primary domain:
1. Open your domain in Cloudflare → Rules → Page Rules → Create Page Rule.
2. If URL matches: `https://your-lookalike.com/*` (the `*` matches any path).
3. Setting: `Forwarding URL` with status code `301 - Permanent Redirect`.
4. Destination URL: `https://your-primary.com/$1` (the `$1` preserves the path after the domain).
5. Save and deploy, then test by visiting the lookalike domain.